[Reservation Program] Step2. Create an AWS RDS database
We built EC2 in the same environment as the previous project. This is because I had a deadline for this project and wanted to develop it in a familiar environment. First of all, the AWS EC2 instance environment used the same method as the link below, so it may be helpful to refer to it.
If you have completed creating EC2 and setting up basic Ubuntu using Putty as described, in step 2, you will want to set up AWS RDS for deployment. (In my case, I have already created it at this point, but I created another one for backup data so that there is no damage to actual users in case a problem occurs during distribution. I would like to explain this process.)
1. Create a database
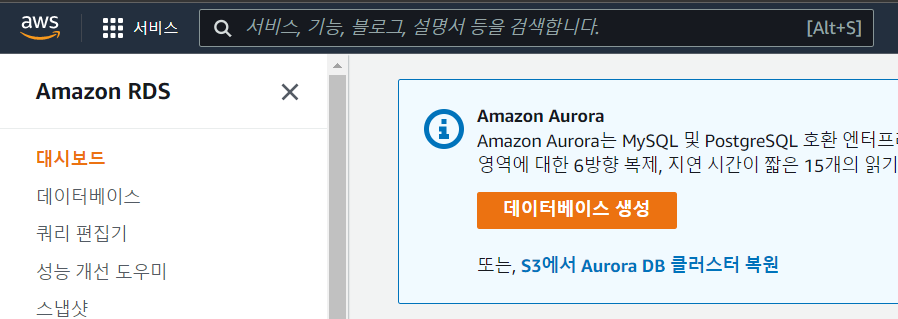
First, check the region in AWS and create a database.
- Database creation: standard creation
- Engine options: MariaDB
- Template: Free Tier
- Settings: The DB instance identifier is specified for easy identification, and the master user settings are also the same. You will need to know the master user name and password later to be able to connect to RDS.
- Instance class, storage: Initial settings. In the case of storage, I set it to the initial value of 20 because I can change it later.
- Connection: All except public access were left at default values. BUT, there are changes later in the process. If you look at the additional configuration for the connection, there is a database port setting. The default value is 3306, but if you need to change it in some cases, change it. If you are setting up RDS for the first time, there probably is no reason to change it. If I am already using 3306 as the database connection port on the EC2 server.
- Additional configuration: Set the database name and set the rest to initial values. The parameter group will be set later.
After completing the basic database settings, you can click the create button. It takes some time to complete creation. (In my case, about 2-3 minutes?)
Now it is time to set up the parameter group.
A parameter group is a function provided by AWS for specifying option values in an RDS database.
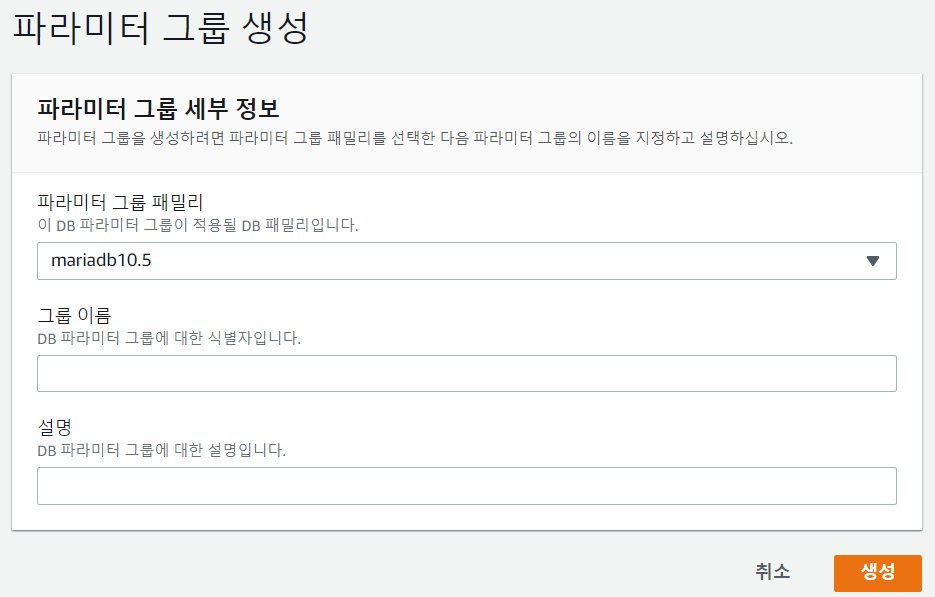
Select Parameter Group from the menu on the right to create a parameter group. Select the same parameter group family as when first creating the database. If created in the same manner as above, mariadb 10.5 is used at the time of writing. Write the group name and description freely and click Create.
I changed a few values of the created parameters, but since the region is Seoul and the service is operated in Korea, I changed the time_zone setting to Asia/Seoul. And all settings starting with character_set were set to utf8mb4. utf8mb4 is a parameter value used in mysql and mariaDB to expand support for expressions such as emoticons.
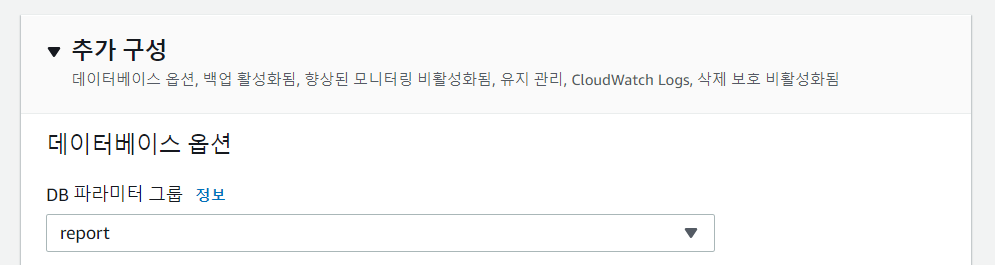
If modifications have been made, in editing the created database, specify the parameter group for additional configuration as the group just created, not the initial value. And since it is a database that is not operated by the service, it allows it to be reflected immediately.
Now it is time to set up the security group.
When creating the database, we set it to allow public access, which was set that way for the purpose of including the EC2 security group in the inbound rules.
First, add an inbound rule and set the EC2 security group to which you want to connect as the MYSQL/Aurora type source. Additionally, one more inbound rule is added to specify the source as the security group at the time of RDS creation in all traffic conditions.
There were no changes to outbound rules.
2. Check whether database is created
2-1. Putty check
To check whether the RDS connection is correct, you can first check using Putty. In Putty connected to the server, enter the master account name and RDS endpoint you set as follows. And after entering the master password, you can see that it switches to mysql and allows you to enter queries.
mysql -u 마스터계정 -p -h RDS엔드포인트2-2. Verify IntelliJ Database connection
In my case, I tend to manage RDS using IntelliJ database.
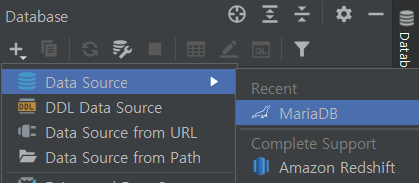
In IntelliJ, click Database on the left sidebar and click the Add button (+). Connect to Data Source > MariaDB.
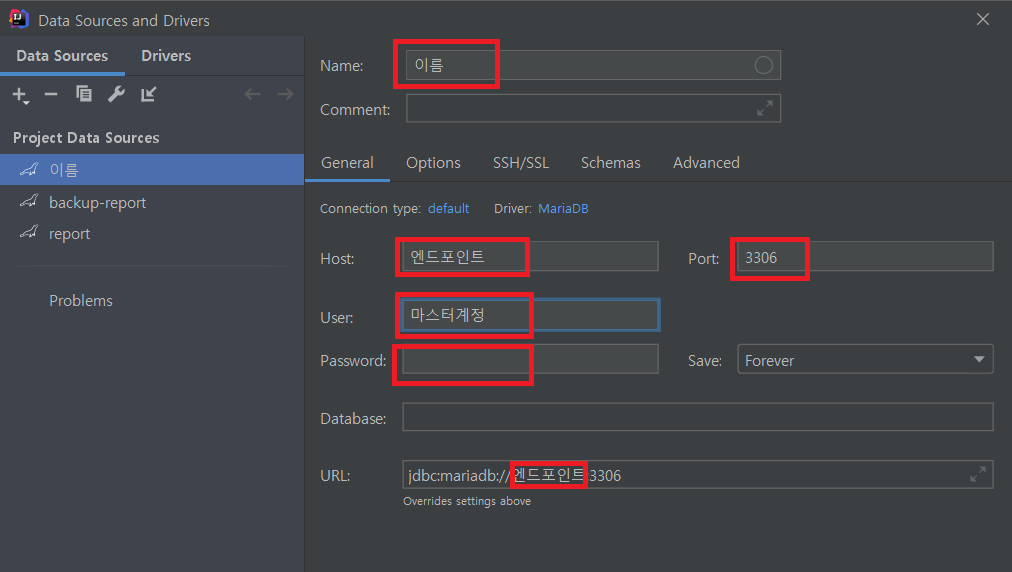
When a new window appears as shown in the second picture, specify the name arbitrarily, enter the endpoint as host, and enter the master name and password used when opening RDS as user and password. Just check that the port is set to the number you set or the default 3306, perform a test connect, and complete creation.
Comments
No comments yet. Be the first!
164 posts in 테크
- 2233D Gaussian Splatting vs Unreal Engine: Two Ways to Build a 3D World — and Where Each One Ships
- 222LLMs Inside Unreal Engine: The New Skills Game Developers Need in 2026
- 220Living With Claude Fable 5: How the Most Capable Model Changes the Way You Actually Work
- 219Luma's Bet: From Video Generator to a Single Model That Thinks in Pixels
- 215The Best AI Video Models in 2026: Types, Differences, and Where This Is All Going