[Reservation Program] Step1. Complete overview of creating a project
This article is intended to organize things that you may have encountered while creating a similar project or that you may not remember.★
For projects that run without separate DB settings, I previously wrote down the project creation method and AWS deployment in order under the category “Deploying Spring web pages with AWS.” You can take a look at the specific project process through the link below.
In this reservation program project creation, many parts are explained except for the content that overlaps with the previously created project creation and distribution order, so if you are not sure, it is recommended to look at it first.
This project also used a similar development environment. The overall outline of this project will be covered in Step 1.
Project development environment
- OS: Window10
- IDE: IntelliJ IDEX 2021.1.2 x64
- Language: Java 8, HTML5,CSS3, JS
- Middleware: Tomcat9, Apache2
- Framework: Spring Gradle
- DB: MariaDB Server 10.6.5
project deployment environment
- OS: AWS EC2 Ubuntu 20.04
- DB: AWS RDS MariaDB 10.5.1
1. Project composition
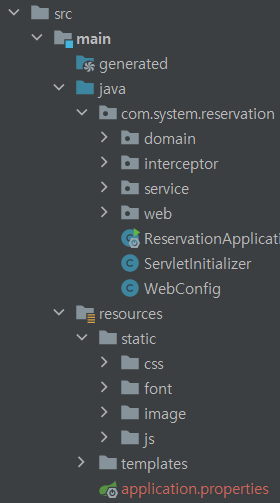
In this project, I read a book called 스프링 부트와 AWS로 혼자 구현하는 웹 서비스 and used what I learned on my own in the project. First of all, as in the book, I created a structure so that I could use entities to link with the repository, and dto could be used separately. The composition of this project is as follows.
The domain is a directory containing entities and repositories, and is composed of controller and dto subdirectories at the web level.
2. build.gradle dependencies
The dependencies needed for this project are as follows.
To explain briefly, thymeleaf is a template engine that is useful for layout and variable processing. I created it while looking up the grammar in thymeleaf, but I think it would be good to look at it later while organizing it.
We added spring-boot-starter-web required for the spring web project, spring-boot-starter-data-jpa for using JPA, and spring-boot-starter-security required when configuring login via intercept and during deployment.
lombok simplifies @ annotation processing and avoids setting getters and setters every time. In other words, writing code is definitely reduced.
json-simple was used to receive json dataType through ajax, mariadb-java-client for DB, spring-boot-starter-tomcat to run basic Tomcat, and spring-boot-starter-test to write test code.
dependencies {
implementation 'org.springframework.boot:spring-boot-starter-thymeleaf'
implementation group: 'nz.net.ultraq.thymeleaf', name: 'thymeleaf-layout-dialect', version: '2.4.1'
implementation 'org.springframework.boot:spring-boot-starter-web'
implementation 'org.springframework.boot:spring-boot-starter-data-jpa'
implementation 'org.springframework.boot:spring-boot-starter-security'
implementation 'org.projectlombok:lombok'
annotationProcessor('org.projectlombok:lombok')
implementation 'com.googlecode.json-simple:json-simple:1.1.1'
runtimeOnly 'org.mariadb.jdbc:mariadb-java-client:2.1.2'
providedRuntime 'org.springframework.boot:spring-boot-starter-tomcat'
testImplementation 'org.springframework.boot:spring-boot-starter-test'
}
3. application.properties
The application.properties configuration for this project is as follows:
First, set up the mariadb driver.
Connect the port number (3307 in my case)/database name to connect the session to localhost as the URL. The default port number is 3306, but since it is already in use, I installed it as 3307 during the first installation. In this case, you must be careful when distributing it later and distribute it as application.properties, which is 3306.
I registered the username and password created during creation, and set show-sql to true to check whether the SQL query statement was entered properly when running.
spring.datasource.driver-class-name=org.mariadb.jdbc.Driver
spring.datasource.url=jdbc:mariadb://localhost:3307/report
spring.datasource.username=root
spring.datasource.password=****
spring.jpa.show-sql=true
I think the structural outline of the project has been finalized, and next I plan to record connecting AWS RDS to EC2.
Comments
No comments yet. Be the first!
164 posts in 테크
- 2233D Gaussian Splatting vs Unreal Engine: Two Ways to Build a 3D World — and Where Each One Ships
- 222LLMs Inside Unreal Engine: The New Skills Game Developers Need in 2026
- 220Living With Claude Fable 5: How the Most Capable Model Changes the Way You Actually Work
- 219Luma's Bet: From Video Generator to a Single Model That Thinks in Pixels
- 215The Best AI Video Models in 2026: Types, Differences, and Where This Is All Going