Creating dynamic web pages using Spring internalizr (Gradle), IntelliJ, and AWS EC2 - Step 2 project configuration, Git integration
0. Dependency libraries
Gradle pulls in dependent libraries, and there are three main types of Spring Boot libraries built in step 1.
1. spring-boot-starter-web
2. spring-boot-starter-thymeleaf
3. spring-boot-starter (common)
spring-boot-starter-logging > logback, slf4j
A separate test library is spring-boot-starter-test, which includes junit, mockito, assertj, and spring-test.
This will be reorganized separately.
1. Create Main Page (View only)
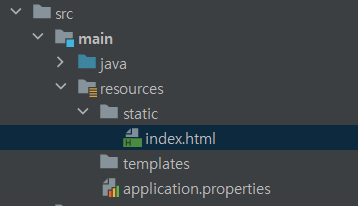
If you create the src > main > resources > static > index.html file in the path and turn it off and on again, the page created in the corresponding index.html will appear on the local:8080 page.
2. Using thymeleaf template engine
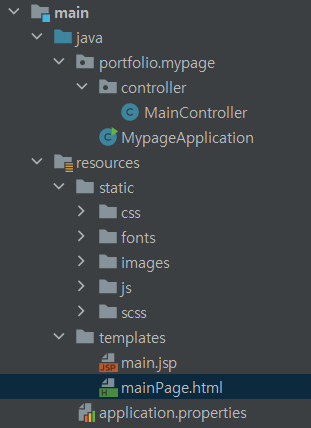
This is the current project structure. To learn dynamic web page composition, html and jsp files were placed in templates. And the css, fonts, images, js, and scss of the connected separate resources were located under the static file.
(If you just place the folder under resources, a problem occurs where it is not recognized)
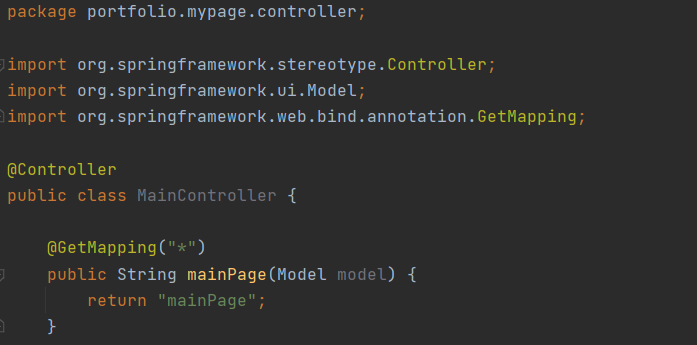
A MainController was created to use the template engine, and all URLs under localhost:8080/ could be linked to mainPage.html unless otherwise specified. Please note that if you put / inside "" in @GetMapping("*"), an TemplateInputException error may occur! (There was no problem with setting the top-level url. That is, it was fine when I only put / in it!)
Then, just enter the code below to apply thymeleaf at the top of the Viewdan page and that’s it!
+ Solving TemplateInputException
While using the template engine, apart from the above precautions, a TemplateInputException occurred in the process of linking jsp files, and the web page did not open. When I looked for it, I found out that it was not supported because it was my first time using intelliJ and I was using the free version, commodity... So I changed it to Ultimate.. haha (설치과정 참조)
3. Integrate with Git
I did the Git integration in order from the setup stage! Since the Monga path was messed up, I decided to set up Git again and upload it to GitHub. IntelliJ makes it easy to manage Git, and you can upload to GitHub in the order below!
First, you can create a new repository in GitHub through VCS > Import into Version Control > Share Project on GitHub at the top and add and manage the project.
Afterwards, management is easy. If you click the green check mark in the upper right corner, a window to commit changes will open and you can set whether to commit the changed files.
You can push by pressing the green arrow. Blue is project update!

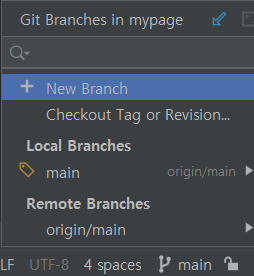
And if you look at the bottom left, you can manage branches. Currently, my repository only has the main branch, so you can see that the local and remote branches only have main.
Comments
No comments yet. Be the first!
164 posts in 테크
- 2233D Gaussian Splatting vs Unreal Engine: Two Ways to Build a 3D World — and Where Each One Ships
- 222LLMs Inside Unreal Engine: The New Skills Game Developers Need in 2026
- 220Living With Claude Fable 5: How the Most Capable Model Changes the Way You Actually Work
- 219Luma's Bet: From Video Generator to a Single Model That Thinks in Pixels
- 215The Best AI Video Models in 2026: Types, Differences, and Where This Is All Going